The Project
To develop my skills in games localization, and get some hands-on experience, I took it upon myself to find and localize a simple game into Japanese. From the get-go, I knew I wanted to localize a game that was made in Unreal, because based on my, albeit limited, experience, Unreal is a fantastic and intuitive game creation engine. Unreal also comes with a lot of baked-in localization features that other popular engines lack or require external plugins for. In addition, I’m planning on making a simple puzzle game in Unreal next year, so I saw this project as an opportunity to get my feet wet.
After several rounds of Googling, I finally found a good sample project that the creator had generally announced was open to the community and could be used as a learning tool by anyone. You can find a link to the post made by the creators here where they outline all of this, but I want to shout them out here as well.
This project was originally created by: Coqui Games
The music was created by: Frank Liu
Copyright Disclaimer: under section 107 of the Copyright Act of 1976, allowance is made for “fair use” for purposes such as criticism, comment, news reporting, teaching, scholarship, education, and research. This project is a proof-of-concept, and as such does not represent nor infringe on the creator(s) in any way.
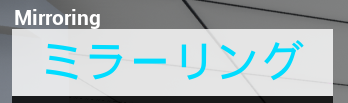
Localized Gameplay Demo
The Tools

Unreal Engine v4.27
This is the game engine in which the original project was created in. I chose version 4.27 because it was the closest version to the original project’s (4.15) and because I had done a simple project in 4.27 before.

Phrase Strings
Phrase Strings is a web-based string management tool that is designed for software localization projects. It works very well for games as well.
Blender 4.3.0
A free 3D modeling tool. Two of the assets I needed to localize were 3D models, and I needed a way to generate localized versions.
The Process
Step 1: Screenshots Galore
The first part of any games localization project is one of the best parts: playing the game!
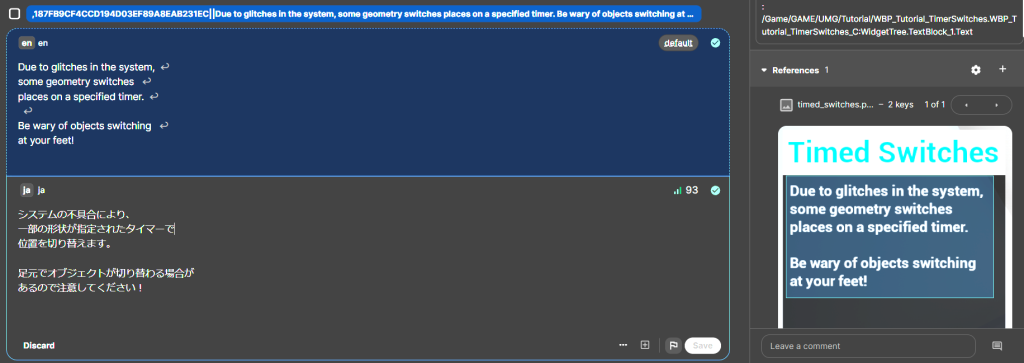
While playing the game, I took several screenshots just so I could get an idea how the text appears in-game. Having the screenshots on hand gives me a good reference for what kind of strings I’ll have to extract and localize, as well as how text-expansion/reduction would affect the Japanese translations. Moreover, during translation, I was able to link screenshots to strings in Phrase Strings to provide myself immediate context while translating.
Keep in mind that you can take screenshots within the Unreal editor as well, but you might not be able to find all the strings in the editor alone! Some of them are dynamically updated in-game.
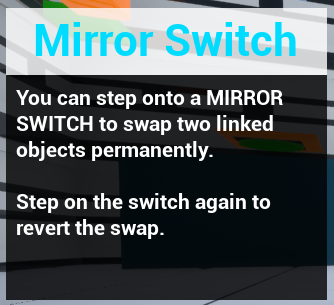
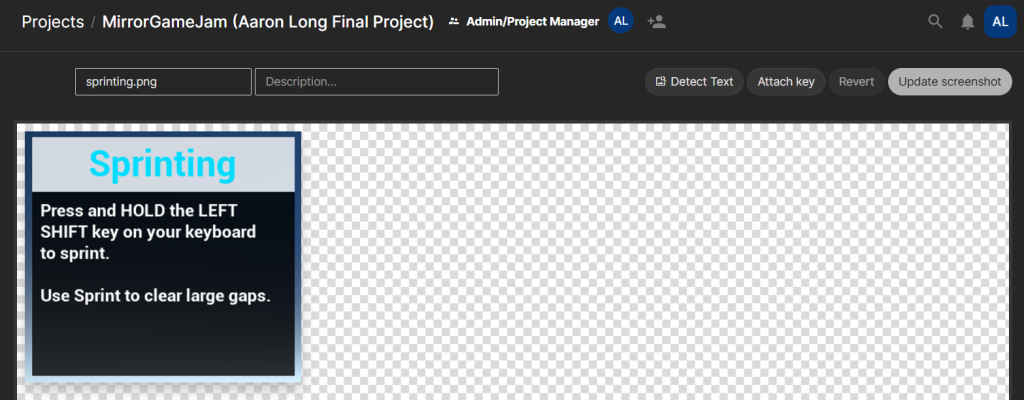
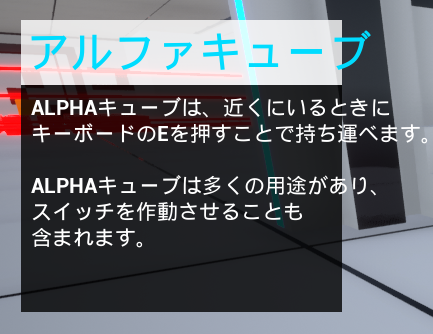
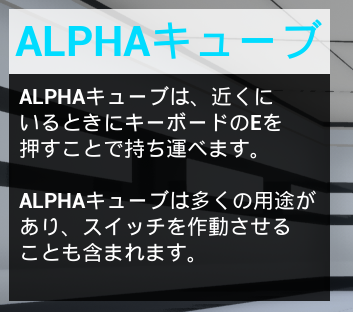
Take a look at a few of the screenshots I took:


Step 2: String Extraction
String extraction in Unreal requires a few steps.
First, you need to create a culture (Unreal’s version of what is commonly known as a ‘locale’), a button for which you can find underneath the ‘Culture’ section of the Localization Dashboard. In my case, and although it sounds funny to say, I created the Japanese culture.

Second, you need to find out where your strings are and make sure they are localizable. Every text option has a little checkmark box that indicates whether or not the text should be localized. Unreal, uniquely it seems, defaults this to YES, which means that unlease the developer had it out for localizers for some reason and painstakingly clicked NO for each and every one, you should be good. In my case, the developer liked localizers and so all the text was already toggled as YES.
Note: There are some cases where you want to make text unlocalizable. A good example of this is in a language selector, where each language choice should appear written in the corresponding language and should not change, regardless of the currently selected language.
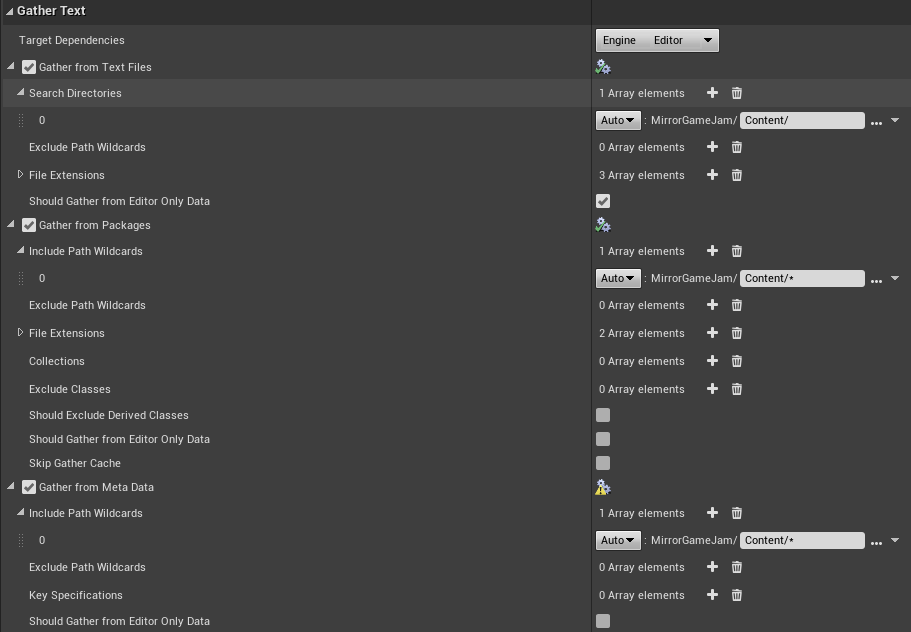
Third, you should figure out where those texts you need to localize are in your file system, and let the localization dashboard know where to look for them. My game was small, so I knew that I could simply have the localization dashboard search in every directory by using the ‘Content/*’ file path. However, in larger games, you would probably want to indicate specific directory paths to reduce complexity and the time it would take your system to search for localizable text.
Fourth, you should press the gather text button! If all goes well, you’ll wait a bit and it’ll tell you it gathered text successfully! If you’re me, you’ll have forgotten to specify where to gather text from and encounter errors until you do step three!

You can confirm that the text has been gathered by looking at the updated Word Count bar. You can also click the ‘edit translation’ button and double check that the strings you expected were gathered.

Finally, you should click the export translations button for your target culture and save the .po file!

Challenge: Non user-facing strings
You might have noticed that my Japanese Word Count is at 94%. This is because I had about 11 strings that I chose not to translate because they were not user-facing. My best guess is that they are involved in variable naming and so I did not want to translate them so as to avoid breaking the game logic or code. In hindsight, I would definitely be more specific in choosing my Gather Text Locations. The reason why I went with the ‘Content/*’ strategy was because my first attempt at specific file path searching left out the popup UI strings that were attached to the PlayerCharacter blueprint, and so I decided to just search the whole game directory in order to avoid missing strings again. I think a happy medium between general and specific is necessary here.
Step 3: Phrase Strings
You can use whatever TMS or CAT tool you want that works with .po files, but I heartily recommend Phrase Strings. The main reason for this is the ability to attach screenshots to different translations. You can upload all your screenshots in bulk and either auto-detect or manually detect the text in each screenshot and link it to a translation!

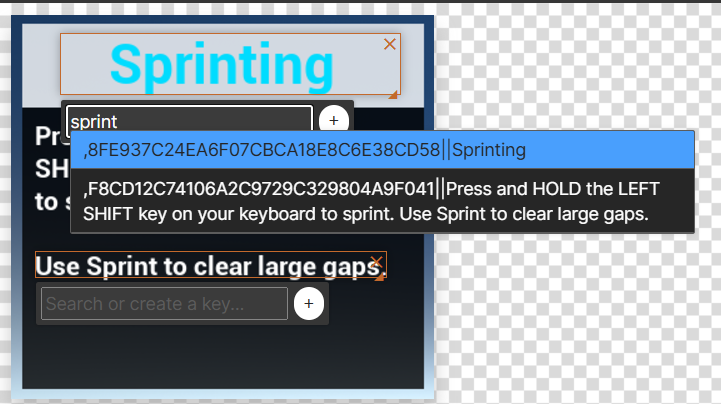
This is somewhat of a tedius process, but you absolutely see it’s worth when you translate within the tool and see in-context screenshots popup as you work. Downloading a final translated PO file once you finish is also a snap!
Step 4: Reintigration
Reimporting the text is the easy part, you just click the import button in the localization dashboard.

But, that is when your troubles begin. When I played the game again, I noticed several text overflow issues in the game because the Japanese text took up more space. To rectify the tutorial popup overflows, I altered my translations and reformatted them so that they would fit within the UI box.
To rectify the top popup collision with the Elapsed Time ticker, I shortened my translation and moved that UI element to the right. Thankfully there was ample space left, and so it did not look awkward in the new space.
Challenges: Guesswork and non user-facing strings
Making sure the reformatted translations worked was an arduous process because I essentially had to replay the game over and over until I was able to see the popups in context. I suppose this is what developer tools are for, but being that I picked up this project without being in direct contact with the creator, I was unsure how to access the testing tools. This highlights the importance of communication and clarity between the development team and localization team.
This is where I first noticed the non user-facing strings issues, because some of the strings I purposely left untranslated, erroneously believing they were hidden from the user, were actually user-facing. Again, I needed to play the game and bug test in order to make sure I got all the strings incorporated sucessfully.
Step 5: Blender Asset Localization
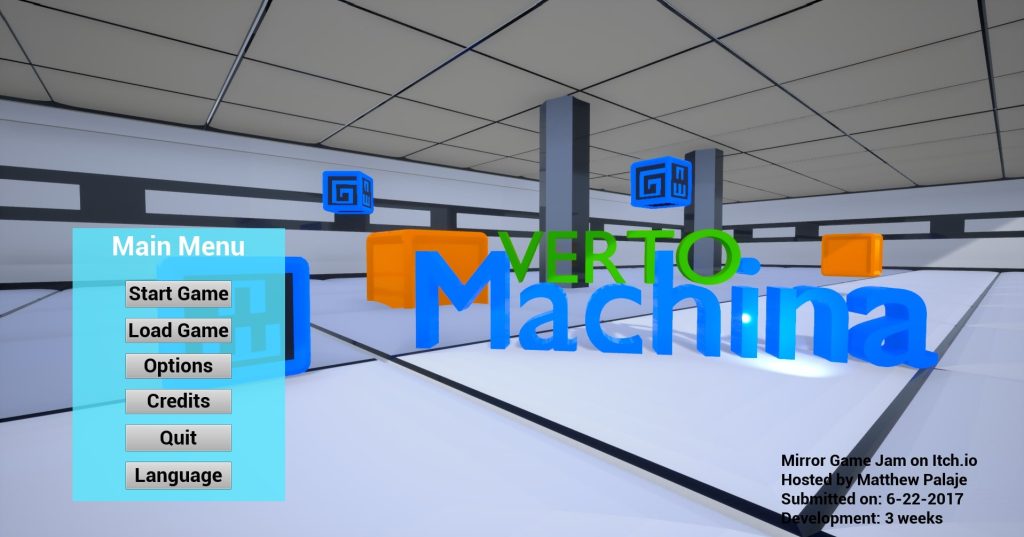
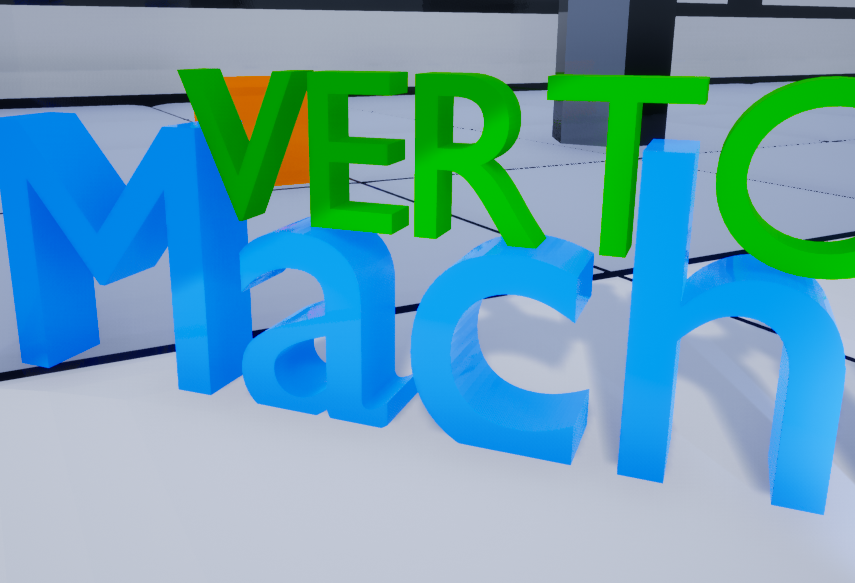
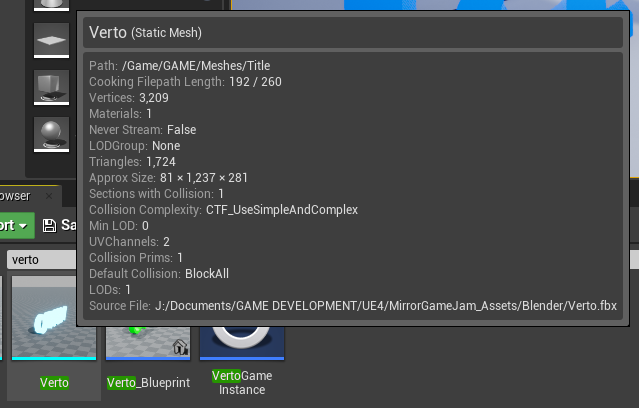
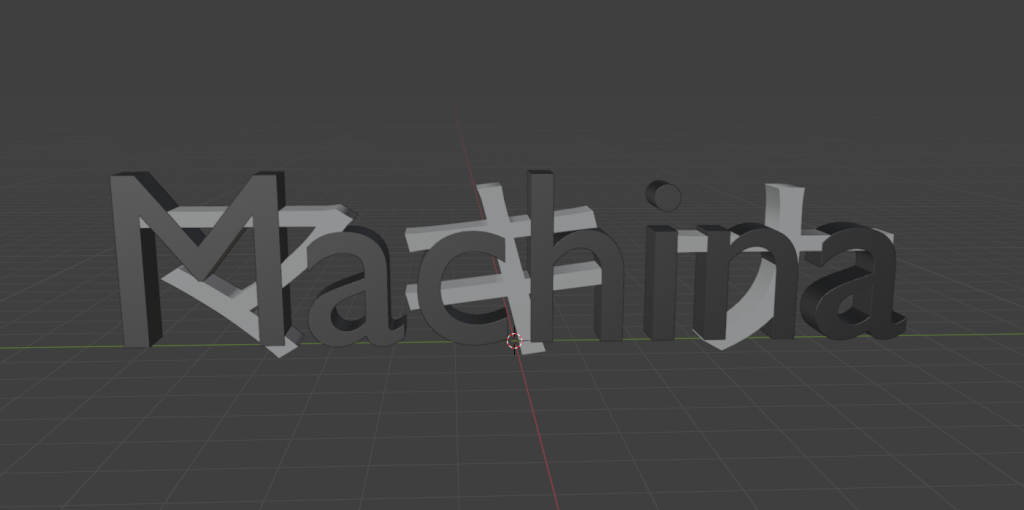
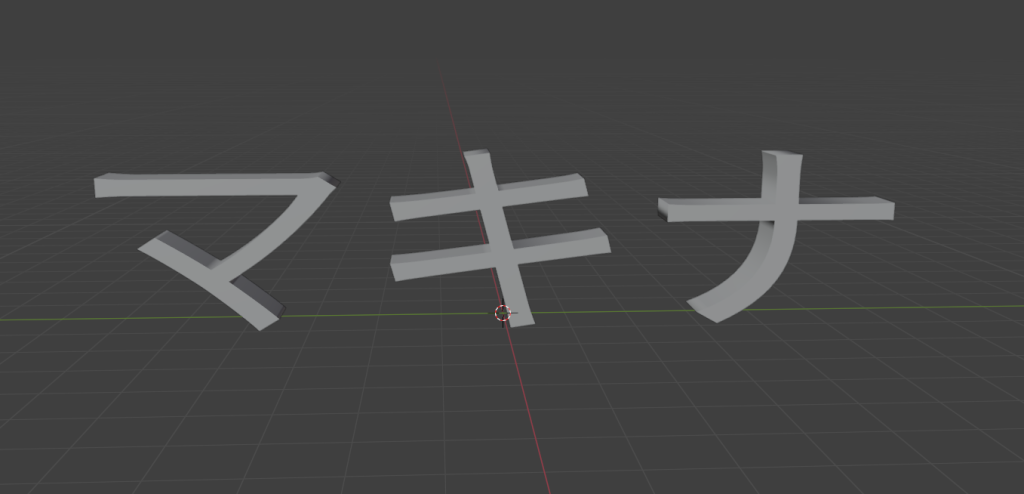
After making sure all of my translations were incorporated successfully, there was only one set of unlocalized text left: the game’s name in the main menu, Verto Machina. Inspection of the level within the Unreal editor showed me that each word was a 3D model that was created from an FBX file.
Assets, such as images or 3D models, are not as easily localized as strings. There is no ‘gather assets’ function. Instead, localized assets need to be created and linked individually and manually. Thankfully the process isn’t too difficult or involved.
First, you need to right click on the asset in the editor folder view and select ‘Create Asset’ followed by whatever culture you need a version for (in my case, Japanese). This will create and stick a copy of the original asset in a special folder within a L10N folder.
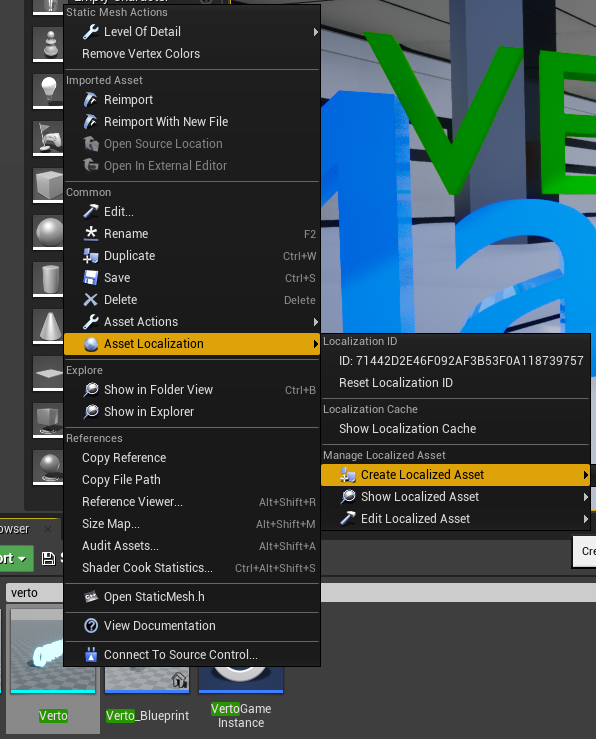
Second, you need to find or create your localized asset.
In my case, I utilized Blender to create 3D text. I followed this YouTube Tutorial. I was also able to export the original assets and import them into my blender projects for size comparison. I exported the final version as an FBX file for consistency.
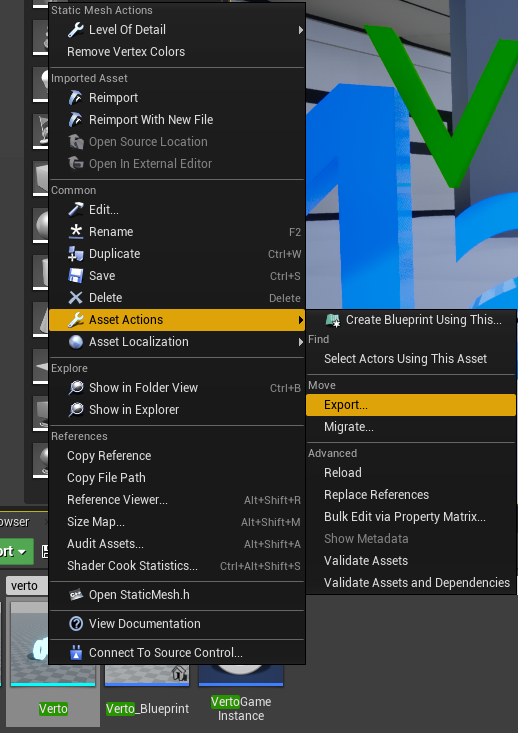
Third, you need to go to the copy of your asset within the L10N folder and reimport it. Make sure you select your newly created asset!
You’re done! The asset should be replaced with your localized version whenever you switch cultures.
Challenge: Why does it import like that?
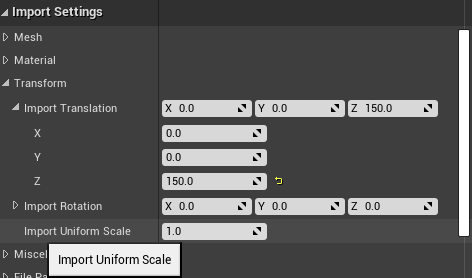
For my short project before I undertook this one, my localized png file replaced English version seemlessly. However, this time around, I found that my 3D assets imported and were HUGE compared to their English counterparts. After some messing around, I found that in the import settings, they defaulted to being imported uniformly at a 10x scale. Why? I have no idea. But, when I set that scale to 1x and imported them again, they were the perfect size.
They also didn’t import with the correct color, thankfully I was just able to slap on the same texture that the English assets used and the color changed without too much trouble.
Finally, because of the different shape of the Japanese ベルト・マキナ, there was some overlap and clipping between the top and bottom text. To fix this, I simply went into the import settings again and adjusted the Z axis transformation to be a bit higher (you can see it at 150.0 in the Import Settings above).
Step 6: Adding Functionality
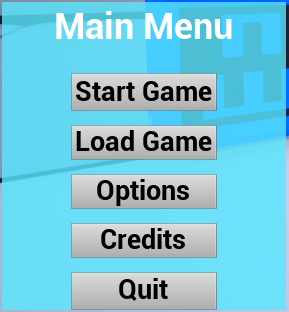
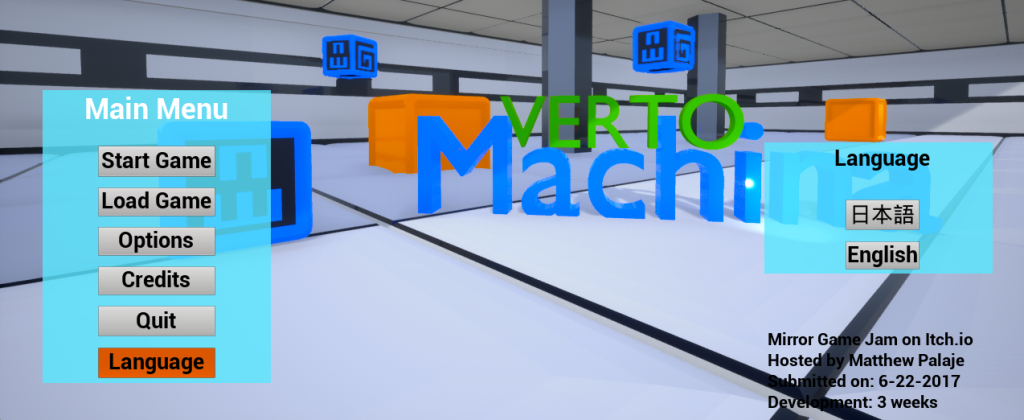
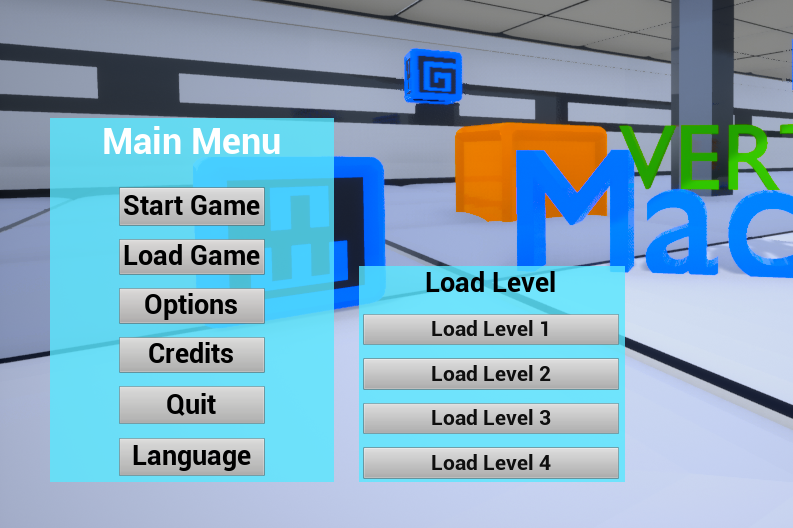
Now that the Japanese version of the game was functioning, I wanted to add some functionality in the form of a language selector in the main menu so that users wouldn’t have to change their default language in order to access the Japanese version. To do this, I added a Language button to the main menu panel and made it so that when you clicked it, a popup would appear with a button to put the game in Japanese and a button to put the game in English. To achieve this, I copied the appearance and logic of the other popups on the main menu.
The functionality I couldn’t copy over was the ability to change cultures with the buttons. Thankfully, Unreal makes this easy. I simply went into the Main Menu’s Event Graph, created the event’s for each button’s ‘On Release’ (when you let go of the button) and linked that to Unreal’s built in ‘Set Current Culture’ function. I of course, specified each button’s culture to Japanese and English, respectively.
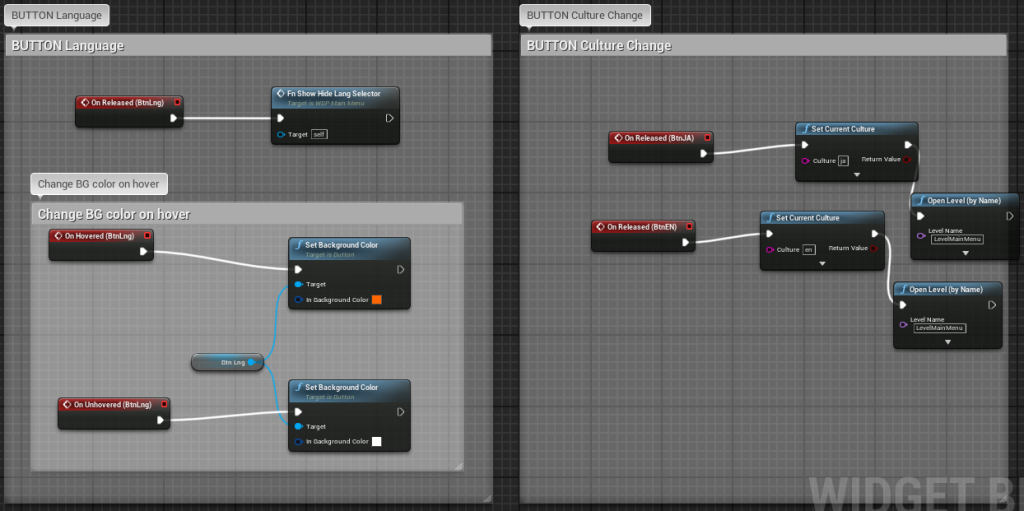
Unfortunately, while the button did great in swapping all the text strings, I found that my 3D assets were not being replaced with the localized versions. I took a guess that I’d just need to reload the level for them to switch out, and I was right. Knowing that, I changed the Event Graph so that after the culture was swapped, the main menu would reload. This was as simple as setting the ‘Open Level’ function to happen after the ‘Set Current Culture’ function.
Step 7: Replacing Functionality
After beating my head against the level loader for a long time, I decided that it was, in it’s form at the time, unlocalizable.
This is because the level loader was a dropdown that populated itself during runtime using a dataset asset. The level names were not stored as strings or texts, but rather as ‘name’ variables, which did not play nice with localization features. In other words, the level names (Level 1, Level 2, etc.) could not be gathered by the gather text function, so they would always appear in English, regardless of set culture, because that is how they were stored in the dataset. As you unlocked more levels, the dropdown would be populated.
After messing around, I discovered that I could make a localized version of the dataset, and translate that dataset; however the way in which the level progression was set up meant that when I used the localized data set, the level names would appear properly in the loader, but the levels would not progress correctly. Upon completing a level, you would just get sent back to the main menu.
What is more, the level dropdown list would save levels in the language they were unlocked in. So, if I unlocked level 2 in English, I could load “Level 2”. If I then switched to Japanese and unlocked level 3, I would be able to load “Level 2” and “レベル3”. Basically, level unlock names were saved in the dropdown as whatever language they were in when the level was unlocked.
Rather than fight with the dropdown menu, I decided I would make an equivalent version that had simpler functionality. I replaced the dropdown and buttons with 4 buttons, each corresponding to a level, 1-4. I set those up so that the text could be extracted by the gather text function, translated them, implemented them, and went about my day. I would argue that for a simple game like this, it’s better to have all level accessibility from the start so you can play around with the different game levels and new interactables, but technically I have removed the level unlock feature and given access to everything from the start.
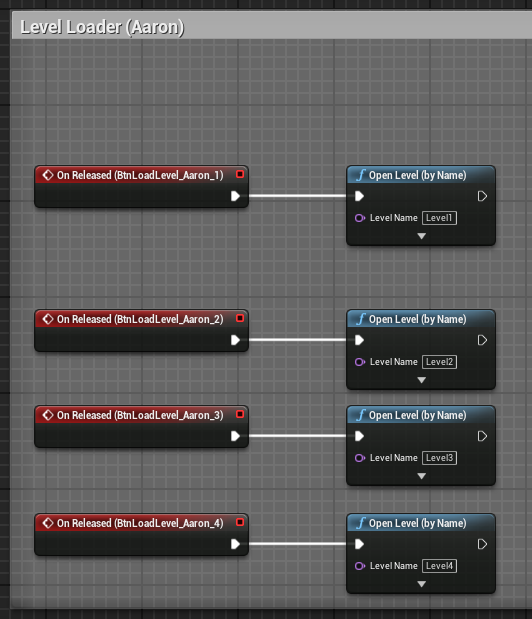
If something like this were to occur on the job, I would contact the developer and see what could be done to make those level names accessible for the dropdown. I would probably suggest that the list of dropdown options with functionality be made beforehand and hidden. Instead of populating the dropdown with names as levels unlocked, they hidden options would simply be revealed.
Continuous QA
The unsung and unmentioned hero during this whole process is running multiple rounds of QA. I played through the game myself several times, so much so I felt like a speedrunner at times, and I also gave it to a few other peers. Notably, my brother, Chris Long, played the game multiple times and was the one who pointed out that the level loader was not functioning properly.
He’s a professional voice actor! Check him out here.
Conclusion
This was one of my favorite personal development projects I’ve ever done. First, I love video games, so I already had a passion for the medium, but I also got to look behind the scenes and see how the sausage is made. Unreal is one of the most popular game development engines on the market today, and being able to grapple with it myself and produce a full product gave me an amazing feeling. With that being said, my three biggest takeaways from this project are:
Event graph mapping is intuitive and very useful when you get the hang of it.
A couple times during this project, I need to edit the event graph of a map or widget. It was very daunting at first, but once I got used to it it was actually a really cool system and way of representing the logic of the code behind the scenes. I’ve seen several engines use the same kind of event graph visualization, so growing familiar with it will help me in general as I move forward as a games localizer.
Knowing how the code works, or being in contact with someone who does, like a developer, is vital
While I was successful in fully localizing this game, I can only imagine how much faster it would have gone if I could just ring up the developer and ask them how the strings are displayed. I could have also, perhaps, gotten access to the original blender file that created the 3D word assets. With that I could have done something simple like retype the word in Japanese instead of having to recreate the asset from scratch. It just goes to show that communication between developers and localizers is essential!
It’s not a black box and it’s not rocket science
Finally, and a bit more poetic, I built confidence that this stuff, all the facets of games localization, isn’t insanely complicated or impossible to intuit. It just takes patience and a willingness to be creative and Google a lot of things. I started playing ‘Warhammer 40,000: Space Marine 2’ shortly after completing this project, and I found myself looking at the different text popups in the UI and menus and realizing that I did, in fact, know how that worked and how I might go about putting it in a different language. It’s a great feeling.

If you’ve stuck with me this far, thanks so much and I hope you look forward to my future games localization projects!